
~ renovation project for resale, several times ~
Back in 2004 - 2005 I was in Florida with my son so he could attend community college and work on his grades. There wasn't the Flip of Flop phenomenon on HGTV like there is today - but I did notice it might be a good time to invest or flip properties. I was successful on my first 2 properties - purchasing, refurbishing cosmetically ONLY and closing on them in 5 months turn around.
In 2005 I was back in Florida taking care of my Mom with cancer... So I continued to flip. Well, with the recommendation from my realtor I purchased this one.

BEFORE
I closed on it just after Hurricane Wilma hit in October 2005 and went to work updating it and putting it back on the market in late January 2006.

AFTER
Wish I had a better photo - this is from the old MLS in 2006. I had to do tons of landscape clean up so the house could be seen. The first renter broke the garage door on the right in 2010. So it's not in this photo....

Before and After.

Before and After


BEFORE and AFTER
just cleaned up the kitchen and added some beachy touches.


BEFORE and AFTER
I just painted the walls to match the unique mosaic tile treatment and added the flowing white curtains. This was a finished 1st floor of a stilt home and could be used as a bedroom (had a full bathroom), office or play room. The double french doors lead out to the secluded garden patio.


BEFORE and AFTER

WRONG WRONG WRONG!
The house didn't sell and I was force to hold on to it for 10 years and several renters. The property value plummeted in half so I had to hold until it came back. To this day it still hasn't come back in this small and quaint boating community. It took all my profit and it took a lot of abuse over the years. The day my renters moved out I walked in and said to myself ' how am I going to make this place look good?". Others said just dump it but it was already an eye sore and I knew I had to fix it to move it.
I had to do this step by step - I didn't want to spend a lot - but the house is now 20 years old and needs updating. Much of it was purchased at Home Depot originally and was now showing it.
I started with the outside. The old peach Bali formula was now tired and I needed an updated beach feeling. All the brown wood was sprayed / painted white. There is a dark blue on top and a bluish gray on the bottom stucco. I'm thinking NAUTICAL - Cape Cod feeling.


Since the right garage door was still gone - I also removed the left side - but left the electrical incase the new owners wanted to replace. This was the cheaper option.

It doesn't hurt that our Vet gets parked in the photo. In 2005 it was our MERC 560SL in the photo.

A landscape clean up was needed - and a few more items strategically placed to hide the neighbors.

Gray paint on the floor deck - brown stain on the ceiling - and all the railings and trim white.


The reason I purchased this home was because at the end of the street - only 7 houses away was this canal that led to the gulf. The story told to me by my my realtor was that the community was going to build more boat docks for the homes on dry lots - but it never materialized so the story was false. I bought way too high - and should have walked away before I closed from this bad false lead from the owners. I even tried to work on the project myself but couldn't find the ownership of the land underneath the water along the shoreline. What a nightmare....

Remember before! Here it is currently.


POW! We painted everything white. My husband and I actually painted the kitchen cabinets and this wall unit in the dining room.
I had these curtains made for my own living room while in China. The fabric was so wide there was a lot left over when cutting my widths - so I had these made from the left overs.
Short story - the cute cotton blinds are from HD 10 years ago. They were looking dirty but they are the perfect size and look for the windows. To clean them up - I dipped them in my pool and laid them in the sun to dry. BINGO back up they went.

I had all the walls painted a lighter color - light oyster tone and the ceilings lighter - along with all the white trim work. These chairs were only $250 for the pair - so I used them to fill up the space. The trunk was only $10. Note I switched the dining area to the awkward front area where it fits better. That way the living room space is twice the size and next to the kitchen.

After 10 years of renters and several dogs - these gorgeous floors were a MESS! I was thinking of painting all the floors white - but that was too much labor and expense - so I purchased seagrass rugs to hide everything. It's what the renters should have done in the first place.

Before and After

I personally painted all the chairs and console table.
Everything here is from second hand stores/ thrift shops.


I added crown molding to the old cabinets. Next I removed the old exhaust fan above the stove and added a microwave with a fan and light. But that meant I had to also replace the cabinet above so that it would fit. The new cabinet didn't match so I removed the doors - added some molding - and a curtain.

I also added a hanging farm lamp above the sink. The uppers were painted white - but the lowers were painted Taupe to match the new tile flooring - and everything wouldn't be too white. I wanted it to be an extension of the living room colors.

See the stains in the wood - I ended up tiling the kitchen because I couldn't repair the wood. See the fan above the stove. The old tile backsplash was removed. And this is before the crown molding. I also had to work on the frame out for the fridge - it was awful and crooked.


The ceiling spot lights: After the entire inside ceiling had been painted the spot cans didn't fit snuggly back in. So I purchased LED spots to replace all of them to the tune of $600. Ouch. But the place is light and bright and they will last forever.

GUEST BATHROOM
BEFORE

A VERY PLAIN JANE! I didn't want to replace all the tiles - so in the tub area they were reglazed. I also reglazed the bathtub. I wanted everything light and bright.

I left the old tiles on the floor but once everything was staged - you don't even notice them.
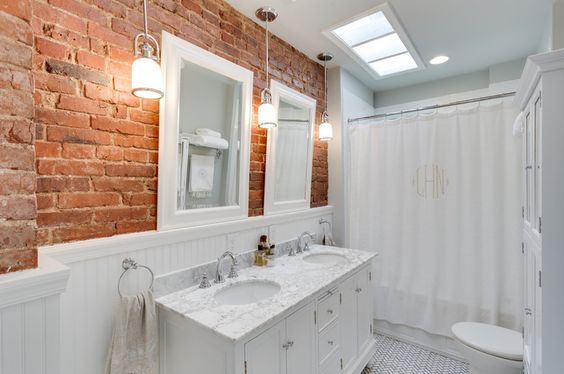
MASTER BEDROOM BATH
BEFORE

The old counters were solid surface with a self sink. The good thing was that the cabinets were in good shape even though they were builders grade - AND they were tall. I couldn't afford granite - so I found someone that could spray the counters and seal them. I also cut out the sink and dropped in a new porcelain with new faucets.
Then I had the mirrors framed out in a white crown molding. The small tile piece was there so instead of removing it - which I should have done - the worker just went up to it. Not my favorite - but doable. The icing is that I changed out all the simple knobs to glass knobs to keep a vintage feeling. And added some needed towel racks.


Note the tile in the shower is all white. See BEFORE below.

The master shower had cream square tiles and a worst tiles on the floor. Up top there's a small dated green decorative tile.
I had the entire shower resurfaced to a bright white and changed out the shower head.
It looked brand new.

I also added hand towel rods - that are actually toilet paper holders. Why I put the red towels in there - it looks like Christmas..... I was looking for a pop of color - but this is just wrong.

I also found a green diamond pattern remnant carpet for the closets to repeat the tile pattern.
DOWNSTAIRS BATHROOM
BEFORE

Again there was solid surface counter with a self sink and old fixtures. The top was cream and the body a high gloss white - which don't match the tile. There was also a navy blue trim around the mirror.

The tiles in the shower were builder grade from HD - with an accent tile that matched the flooring.

The entire shower was glazed a bright white and the trim work was the same as the counter top. I found a sandy mix color that would bring the Mexican tiles back to life.
We didn't drop in a new sink - don't know why - instead we reglazed the bowl to match the shower tiles and added new faucets.

I brought in navy accessories to pop the navy trim around the mirror. I also reglazed the towel racks and toilet paper holders.

The toilet seat needed a new one - so I choose a wood piece to go with the floor. For a room that was blah - I think it turned out nice.
FIRST FLOOR

in 2005
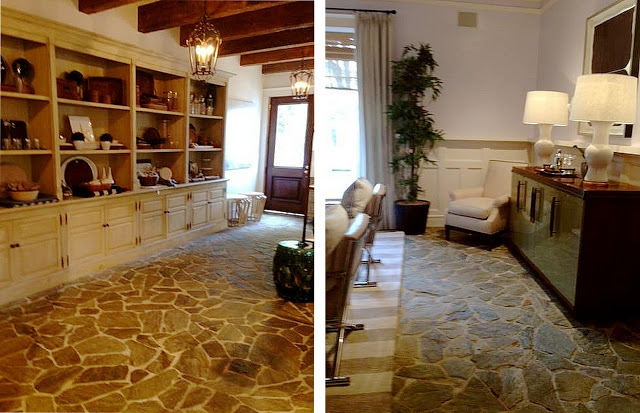
I was in Jacksonville while working on the project and stopped at James Michael Howard showroom and look at the flooring!

BEFORE and AFTER


I simply stage one side as an office and the other as a guest bedroom. This floor does have a full bath and a small closet - and the wet bar is perfect for morning coffee.
I painted all the dark brown windows - WHITE!


A small hallway housed the washer dryer. I laid new linoleum tile myself over the old and re-stuccoed the walls which were in bad shape. We just used a spray on texture that hid all the flaws - an easy fix. The doors were broken and an odd shape - so I couldn't find anything to match. A curtain was my replacement for much cheaper and it doesn't take up as much space as the doors.

New carpet was put down on the hallway and staircase. I went to a remnant place to get it cheap.

All the handles were old brass and had seen 20 years of wear. I took them all off and sprayed them with an oil rubbed bronze. It took a weekend but it was worth it.

I'm a stickler for detail - so I purchased glass knobs from Anthropologie and replaced them everywhere -closets and bathroom vanity. Just small updates on an inexpensive piece.
It's amazing I still blew the budget at $30,000. The staging cost several thousand but they went to a consignment store and I sold off everything.
A young couple bought the home as first time home buyers and an FHA loan. It was a difficult sale because it was 2 stories and no pool. Go figure. It is over 2300 sq feet with 2 ACs and 2 hot water heaters - 3 bedrooms and a full finished 1st floor that is legal square footage. There is Hardiboard siding and a tin roof that will last for years. The project took 3 months.... I was designing as I went - searching out every alternative I could to refurbish on a budget. This was a very bad investment - but I was proud of the final outcome.


Comments
Post a Comment